Back to Top
A Beginners Guide on How to Inject Mice
Posted:
June 17, 2021
Categories:
in vivo research

We have provided a pdf version of this document so that you can easily print out the specific pages you want to read in more detail (please be mindful before printing the whole article).
Basic things to remember when injecting mice
- Use a new needle for each injected animal. Consider needle-free injectors if possible.
- If repeated dosing is needed, rotate the injection site or consider the use of osmotic minipumps.
- Check potential substance effects before dosing.
-
- Substances prior to injection should be pure, sterile and warm (body temperature is ideal).
- Substances should be non-irritant and have a near-neutral pH (pH tolerance varies based on administration route: oral > iv > sc)
- If possible, use biocompatible stable solutions
- Skin sterilisation is often unnecessary with sc injections.
- Following administration, massage the injection site to help disperse the substance. Also apply firm pressure with a swab after the injection to help stop bleeding, particularly after iv administration.
- Use the lowest administration volume possible and do not exceed the current recommended guidelines.
- Use the least distressing and shortest possible restraint method.
-
- Restraint devices are best kept for long procedures where prolonged restraint is required; for short procedures, manual restraint will often be sufficient
- Familiarisation of mouse anatomy will help improve technique and reduce the risk of adverse effects.
(Source: references 1, 4 and 7.)
Overview
The laboratory mouse has been extensively used for biomedical research since the early 1900s.[1] Its successful and continued use in modern medicine relies on several qualities including ease of breeding and handling, short life cycles, and well-characterised genetics.[1, 2] Accordingly, this type of research is now carefully regulated and many guidelines exist to assist both beginners and experts in the field, particularly to help refine protocols and to ensure adverse experiences for the animal are minimised.[2-6] Many factors should be considered when administering substances to mice; an overview of these is presented in Figure 1. Although all these factors play a critical role, herein we provide a focussed overview of several elements pertaining to the injection of mice; specifically, injection location or route of substance administration, injection volume, and injection technique. Some take-away tips for injecting mice are provided at the end of the article.

Figure 1. Important factors when administering substances in mice.[1, 2, 7]
Route of substance administration
There are several routes by which a substance may be administered to laboratory mice. The optimal route will likely be determined by the goals of the experiment, substance pharmacokinetics, potential dosing effects, and anticipated dosing frequency.[1, 4, 7] It is important to consider whether the proposed administration route is the most suitable and whether a less severe route may be used. Moreover, beginners should assess whether the chosen administration route will demand a high level of skill, and if so, seek senior guidance accordingly. Always ensure all experimental materials are prepared before restraining the mouse, regardless of the chosen route of administration.[8] Mouse restraint is required for all administration routes; see here (and accompanying video here) for guidelines on safe restraint and gentle handling of mice.[8]
Common administration routes include, but are not limited to, the following:[1, 4, 7]
- Subcutaneous (sc) injection
- Intraperitoneal (ip) injection
- Intravenous (iv) injection
- Oral gavage
Injecting Mice Subcutaneously
What is the subcutaneous injection for mice?
Key points
- Subcutaneous injection is performed “under the skin” and does not penetrate muscular tissue.[7]
- Subcutaneous injection is a relatively simple, quick, and inexpensive procedure.[7]
- This route often causes minimal pain or discomfort to the mouse, can be easily observed and treatment can be applied if required.[4, 7]
- The most usual site for sc injection in mice is over the shoulders, into the loose skin over the upper back and neck (Figure 2), but other sites with loose folds of skin can also be used, for example over the flank.[1, 4, 7]
- Injection angle should be shallow to avoid causing unnecessary damage to surrounding tissues.[7]
- Route may cause pain if the administered substance is irritant or cytotoxic.[4]
Key Points to Consider When Performing Subcutaneous Injections in Mice
Subcutaneous administration of material often causes minimal pain or discomfort
Subcutaneous Injection Technique in Mice
Restrain the mouse but loosely enough to ensure the skin is mobile. The scruff method (holding the nape of the neck) may be used; however, if routine handling is anticipated following the sc injection, then consider injecting into the dorsal rump or the flank. To create a sc space, pull upwards on the grasped skin to make a tent-shaped skin fold. Using the appropriate needle (see Table 1), inject at a 30–45° angle into the tented skin ensuring the needle is not pushed out the other side. Before administration, aspirate the syringe and check no materials has been drawn back into the chamber; if this occurs, withdraw the needle and repeat the process.[8, 9]
When the injected substance enters the correct location, no resistance should be felt when depressing the plunger. Signs of resistance suggest the injection did not fully penetrate the skin layer.[1] A small swelling in the skin will be observed if the injection has been successful. Upon removing the needle, a small amount of pressure should be applied to the site to prevent material backflow.[8, 9]
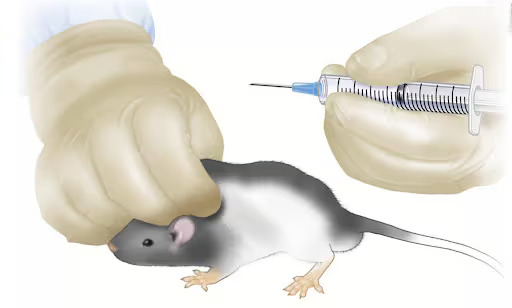
Figure 2. Subcutaneous injection into loose shoulder skin fold of a mouse.
Source: JoVE Science Education Database. Lab Animal Research. Compound Administration II. JoVE, Cambridge, MA, (2023).
Intraperitoneal Injection (i.p.)
What is the intraperitoneal injection for mice, and where does it occur?
Key points
- An ip injection is made into the right lower quarter of the abdominal wall into the peritoneal cavity (Figure 3).[4, 7]
- Although widely used as a means of administering substances in relatively large volumes (e.g. injectable anaesthetics), this is an inherently difficult technique as inadvertent injection into the gut, abdominal fat, muscle and sc tissues can be hard to avoid. Accordingly, other routes such as sc or oral administration are recommended over ip injection.[4]
- IP injections should not be conducted in the same animal more than once daily as cumulative substance absorption following repeated dosing may prove fatal.[1, 4]
- Injected substances should be sterile, isotonic, and non-irritating.[7]
Intraperitoneal Injection Technique in mice
The animal should be restrained with its head and body tilted downwards to ensure the organs are “out of the way” when performing the injection.[1, 7, 8]
An appropriately sized needle (Table 1) should be injected from the caudal direction, at a slight angle to the abdominal wall, with a quick and firm movement, but only so far that the tip barely pierces the abdominal wall. The injection site should be in the lower quadrant of the abdomen and to the right of the midline to avoid anatomically important structures.[1, 8]
Before the injection you should slightly pull on the plunger: if any fluid is seen in the syringe or needle hub, you must inject again with a clean needle and syringe.[1, 7]

Figure 3. Intraperitoneal injection into lower quarter of the abdominal wall in a mouse.
Source: JoVE Science Education Database. Lab Animal Research. Compound Administration II. JoVE, Cambridge, MA, (2023).
Intravenous Injection (i.v.)
What is an intravenous injection in mice?
Key points
- IV injection delivers a substance directly into the blood vessels via a bolus injection or continuous infusion; the injection location in mice is most commonly the lateral tail vein (Figure 4).[1, 4, 7]
- IV delivery is considered the most efficient route for administering substances as it bypasses solute absorption.[7]
- IV injection may be challenging due to the small size of the vein, therefore considerable practice may be required.[1]
- To facilitate the injection, consider the use of an immobilisation device, warming the tail to dilate the tail veins, and improving the quality and distribution of light in the working area.[1, 4]
- The procedure must be aseptic and sterile with non-irritant substances free of particulate matter.[7]
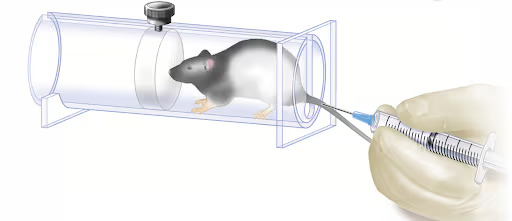
Figure 4. An iv injection into the tail of a mouse.
Source: JoVE Science Education Database. Lab Animal Research. Compound Administration II. JoVE, Cambridge, MA, (2023).
Technique of how to perform an intravenous injection in mice
While restraining the mouse (a Decapicone or plastic rodent restrainer may be used), straighten the mouse’s tail by holding the tip. To facilitate the injection, rotate the tail by 90° to place the tail veins dorsally. The tail can also be placed under a lamp or a carefully controlled warming device (do not overheat the mouse) to promote vasodilation. Starting at the distal end of the tail (allows for re-injection further up the tail should the first attempt fail), place the needle at a 15–20° angle ready for injection. When injecting, do not insert the needle much beyond the bevel as the veins are shallow.[8] If the needle is correctly placed, no resistance will be felt when depressing the plunger and the trajectory of the injected substance will be seen as it advances through the vein displacing the blood within it.[1] Pressure on the point of injection when pulling out the needle, and for a moment afterwards, is required to prevent bleeding.[7]
If the injection is unsuccessful the injected substance will not flow easily.[8] To help avoid needle dislodgement, an over-the-needle catheter or butterfly needle with connecting tubing may be useful. In addition, a local anaesthetic cream may be used to reduce the risk of movement.[7]
Intragastric Administration or Oral Gavage
What is an oral gavage for mice?
Oral gavage in mice is where material is administered orally, normally using a cannula or catheter to dose directly into the stomach.
Key points to consider when performing an oval gavage
- Oral gavage is performed, normally using an oesophageal-gastric cannula or catheter, to gently dose a precise amount of substance directly into the stomach at a slow enough rate to avoid regurgitation (Figure 5).[1, 7]
- Oral delivery may result in a slower substance onset of action compared with other administration routes.[7]
- Although gavage can be undertaken using rigid dosing cannulae, flexible catheters are preferred, and these are less likely to cause oesophageal trauma.[4]
- Inadvertent dosing into the lung may occur, and this usually results in the animal showing immediate signs of respiratory distress. If this occurs, then the animal should be humanely killed.[1, 4]
- Substances that may irritate gastric tissues should be avoided.[4]
- Given the technical skill required to perform the procedure and the ensuing risk of harming the animal, consider an alternative approach to gavage when administering substances orally (e.g. via food or water).[4, 7]
Oral Gavage Technique in mice
To ensure the needle does not pass through the stomach, mark the distance from the mouse’s nose to the end of its ribcage on the gavage needle. Take the mouse into a firm neck-tail-hold so that the head is as immobile as possible. Optimally the neck would be straight so that the mouth, pharynx and oesophagus form a straight line and the best angle to facilitate dosing.[1, 4, 8] While immobilising the mouse’s head, the gavage needle is passed along the palate to the back of the mouth and into the oesophagus. The substance is then administered at a slow rate via a syringe attached to the gavage needle.[1, 8] The needle must not be pushed down the pharynx with force! As the needle enters the oesophagus, ensure no droplets are present at the end of the needle; this helps avoid droplet inhalation and potential severe reactions.[4] Withdraw the gavage needle slowly to avoid reflex regurgitation and then monitor the animal for any immediate adverse reactions.[4]
Dipping the probe in sugar water right before the oral gavage will facilitate and accelerate the procedure. The animal will resist less and swallow the probe more easily when it tastes sweet.[10] Further, lubrication with petroleum jelly or medical paraffin may also assist needle passage.[4]
Possible complications include the passage of the gavage into the lungs (manifested as coughing, choking, struggling, or fluid expulsion from the nose or mouth) and damage to the oesophagus and/or pharynx as a result of the use of excessive force. If resistance or signs of distress are met during gavage insertion, withdraw the gavage and start the procedure again if appropriate to do so.[4] The mouse should be euthanised upon fluid entering the lungs or rupture to the pharynx or oesophagus.[1, 4]

Figure 5. An oral gavage delivering a substance directly to the mouse’s stomach.
Source: JoVE Science Education Database. Lab Animal Research. Compound Administration II. JoVE, Cambridge, MA, (2023).
Injection Volume
It is important to ensure that the administered volume of a substance causes the least discomfort possible to the mouse and does not exert a physiological change that might confound experimental findings.[1, 4, 7] Maximum dose volumes of the administered substance and recommended needle sizes vary subject to the chosen administration route (Table 1).
| Injection Type | Needle Gauge | Needle Length | Max. Dose Volume |
| Subcutaneous | <22G | 0.5–1.0 in | 5 ml/kg/site |
| Intravenous | <25G | 0.75–1.0 in | 5 ml/kg (bolus) or 2–4 ml/kg/hour (infusion) |
| Intraperitoneal | <21G | 0.75–1.0 in | 10 ml/kg |
| Oral | 20–22G feeding needle | 5–20 ml/kg |
Table 1. Recommended needle size and maximum dose volumes of administration in mice.[4, 7, 8]
Further Reading and Useful Links
- Restraining techniques: Maccholz E, et al. J Vis Exp 2012;67:e2771. Video (link).
- Ethical considerations and the 3R’s. Diaz L, et al. Rev Invest Clin 2021;73:199-209 (link)
- Research Animal Training website (link).
- Office of Research. Institutional Animal Care and Use Program (IACUC). https://iacuc.ucsf.edu
- Laboratory Animal Science Association (LASA), www.lasa.co.uk
- American Association for Laboratory Animal Science (AALAS), www.aalas.org
- Laboratory Animal Management Association (LAMA), www.lama-online.org
- American Society of Laboratory Animal Practitioners (ASLAP), www.aslap.org
- American College of Laboratory Animal Medicine (ACLAM), www.aclam.org
- Laboratory Animal Welfare Training Exchange (LAWTE), www.lawte.org
- Institute for Laboratory Animal Research (ILAR), www.nationalacademies.org/ilar/institute-for-laboratory-animal-research
References
- Suckow, M.A., S.A. Hashway, and K.R. Pritchett-Corning, The Laboratory Mouse. Third ed. Laboratory Animal Pocket Reference Series. 2023, Boca Raton: CRC Press.
- Diaz, L., et al., Ethical Considerations in Animal Research: The Principle of 3R's. Rev Invest Clin, 2020. 73(4): p. 199-209.
- National Research Council, Guide for the Care and Use of Laboratory Animals: Eighth Edition. 2011, Washington, DC: The National Academies Press.
- Morton, D.B., et al., Refining procedures for the administration of substances. Report of the BVAAWF/FRAME/RSPCA/UFAW Joint Working Group on Refinement. British Veterinary Association Animal Welfare Foundation/Fund for the Replacement of Animals in Medical Experiments/Royal Society for the Prevention of Cruelty to Animals/Universities Federation for Animal Welfare. Lab Anim, 2001. 35(1): p. 1-41.
- UK Home Office, Guidance on the operation of the Animals (Scientific Procedures) Act 1986. 2017.
- Institutional Animal Care and Use Program. Policies, guidelines, standard procedures. 2024 17 January 2024]; Available from: https://iacuc.ucsf.edu/policies-guidelines-standardprocedures.
- Turner, P.V., et al., Administration of substances to laboratory animals: routes of administration and factors to consider. J Am Assoc Lab Anim Sci, 2011. 50(5): p. 600-13.
- Machholz, E., et al., Manual restraint and common compound administration routes in mice and rats. J Vis Exp, 2012(67).
- Virginia Tech. SOP: Mouse Subcutaneous Injections. 2017 31 January 2024]; Available from: https://ouv.vt.edu/content/dam/ouv_vt_edu/sops/small-animal-biomedical/sop-mouse-injection-subcutaneous.pdf.
- Rodriguez-Palacios, A., M.V. Khoretonenko, and S. Ilic, Institutional protocols for the oral administration (gavage) of chemicals and microscopic microbial communities to mice: Analytical consensus. Exp Biol Med (Maywood), 2019. 244(6): p. 459-470.
